

How to Adjust Overhead Garage Door Springs: A Complete Safety Guide
When your garage door starts slamming shut or feels impossibly heavy to lift, the issue often lies in improperly adjusted springs. Learning how to adjust overhead garage door springs can help you save money and restore smooth, reliable operation—but only when done with strict attention to safety and proper technique. Garage door springs are under extreme tension and can cause serious injury if handled incorrectly.
This comprehensive guide walks you through the entire adjustment process, from recognizing when the springs need attention to completing the work safely and effectively.
Key Takeaways
- Garage door spring adjustment can restore smooth operation, but safety precautions and proper tools are essential at every step.
- Correct spring tension is critical; always make gradual, equal adjustments and confirm the results with balance testing.
- When springs are damaged, systems are under high tension, or results are uncertain, professional service is the safest option.
Quick Guide to Garage Door Spring Adjustment
Garage door springs play a critical role in lifting and lowering your door safely and smoothly. When springs are out of balance, you may notice the door slamming shut, feeling unusually heavy, or failing to stay open. While spring adjustment is a task that requires caution, understanding the basics can help homeowners make informed decisions and recognize when professional service may be necessary.
Below is a high-level overview of how garage door spring adjustments work, along with essential safety considerations. This section is intended to provide foundational knowledge rather than replace detailed, step-by-step instructions.
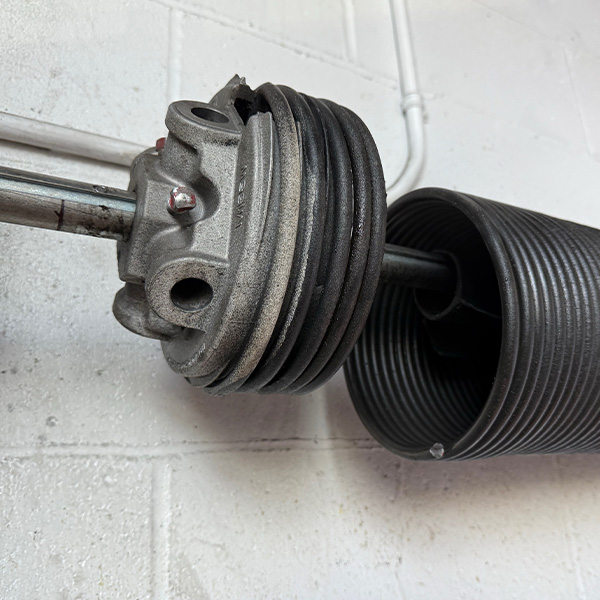
Torsion Springs
Torsion springs are mounted above the garage door and are adjusted by winding or unwinding tension at the winding cone. Proper steel winding bars must be used after carefully loosening the set screws. A standard 7-foot garage door typically requires about 30 quarter turns, while an 8-foot door usually needs approximately 36 quarter turns to achieve proper balance.
Extension Springs
Extension springs run along the sides of the garage door tracks and are adjusted by repositioning the S-hook on the track hanger. Moving the hook to a lower hole increases tension, while moving it to a higher hole decreases tension. Because extension springs can snap back forcefully, extra care is required during adjustment.
Critical Safety and Balance Checks
Before making any adjustments, always secure the garage door using C-clamps or locking pliers on the track, then disconnect the garage door opener and pull the emergency release cord to prevent accidental activation. After adjustments are complete, test the door’s balance by lifting it halfway and gently releasing it; properly adjusted springs should keep the door stationary without drifting up or slamming down. If your garage door system uses two springs, ensure that you make identical adjustments to both, as uneven tension can cause the door to bind, wear prematurely, or operate unsafely.
Signs Your Garage Door Springs Need Adjustment
Knowing when your garage door springs need adjustment can help prevent safety issues, reduce strain on your opener, and extend the life of your garage door system. Watch for these common warning signs:
- Door closes too fast or slams shut: Indicates the springs lack sufficient tension to counterbalance the door’s weight.
- Difficulty lifting the door manually: After pulling the emergency release, the door should lift smoothly and feel relatively light. Excessive weight suggests weak spring tension.
- Uneven or jerky movement: If one side moves faster or the door tilts, the springs may have uneven tension, or one spring may be failing.
- Unusual noises during operation: Creaking, popping, or grinding sounds often point to overstretched or improperly adjusted springs.
- Door won’t stay open halfway: A properly balanced door should remain stationary when lifted halfway and gently released. Drifting up or down indicates adjustment is needed.
Addressing these signs early helps maintain safe and smooth garage door operation, preventing more serious mechanical problems.
Essential Safety Precautions Before Starting
Adjusting garage door springs is inherently dangerous and should never be done casually. These springs store tremendous mechanical energy and can cause severe or life-threatening injuries if handled improperly. Before starting, understand the risks and take proper safety precautions.
Garage door springs are designed to counterbalance the full weight of the door, which typically ranges from 150 to 250 pounds in residential systems. Always wear safety glasses, heavy-duty gloves, and sturdy, closed-toe shoes to protect yourself during adjustments. Position yourself to the side of the springs, never directly in front of them, to reduce the risk of injury if a spring or tool slips.
Before making any adjustments, unplug the garage door opener and pull the emergency release cord to prevent accidental activation. Secure the door in place using C-clamps or locking pliers on both tracks just below the bottom rollers. These steps help ensure the door remains stable and reduces the risk of sudden movement while you work.
Required Tools for Safe Adjustment
Using the correct tools is critical for safely and accurately adjusting garage door springs. Improvised tools can slip, reduce control, and cause serious injury. Essential tools include steel winding bars (typically 1/2-inch diameter and 18 inches long), C-clamps or locking pliers to secure the door, an adjustable wrench for extension springs, a socket wrench set for set screws, and a measuring tape. Proper winding bars are especially important for torsion springs and should never be replaced with screwdrivers or pry bars, which can slip out of the winding cone. When possible, have a second person nearby to assist with ladder stability or emergencies, but only one person should perform the actual spring adjustments.

How to Adjust Torsion Springs Step by Step
Torsion springs are the most common type of spring used on modern garage doors. They are mounted horizontally above the door opening and require careful, methodical adjustment using specialized tools and techniques. Because torsion springs operate under extreme tension, precision and safety are critical throughout the process.
1. Preparation Steps
Begin by opening the garage door fully to help minimize spring tension. Secure the door in place using C-clamps or locking pliers positioned on the track just below the bottom rollers. Unplug the garage door opener and pull the emergency release cord to fully disconnect the door from the opener. Position a sturdy ladder so you can safely reach the springs while maintaining a stable footing.
2. Locate and Identify the Winding Cones
The winding cone is the metal component located at the end of each torsion spring. It contains a series of holes designed for inserting winding bars. Most residential garage doors use two torsion springs, each with its own winding cone. Take note of the direction the spring is wound, as this determines which direction you will turn the winding bars to increase or decrease tension.
3. Safely Loosen the Set Screws
Insert a steel winding bar fully into one of the holes in the winding cone and hold it firmly. While maintaining a secure grip on the bar, use a socket wrench to loosen the set screws that secure the cone to the torsion shaft. Loosen the screws only enough to allow the cone to rotate—do not remove them completely.
4. Use the Quarter-Turn Adjustment Method
Make adjustments using quarter turns only. Insert the second winding bar into the next hole in the winding cone before removing the first bar to maintain constant control of the spring. Turn the winding bar upward (toward the ceiling) to increase tension, or downward (toward the floor) to reduce tension.
5. Apply Proper Turn Calculations
As a general guideline, a 7-foot-high garage door typically requires about 30 quarter turns of tension, while an 8-foot door usually needs approximately 36 quarter turns. These figures provide a starting point; final adjustments should always be confirmed through door balance testing, as door weight and hardware can vary.
Determining the Correct Number of Turns & Testing Balance
Proper spring tension depends on your garage door’s height, weight, and the type of spring used. Most single doors weigh between 125 and 190 pounds, while double or insulated doors are heavier. A simple guideline is to use about 4.5 quarter turns per foot of door height. For example, a 6.5-foot door typically requires around 29 quarter turns. This is only a starting point and should always be verified through balance testing. When available, follow the spring manufacturer’s recommendations, as incorrect tension can cause the door to feel heavy, close too quickly, or strain the opener.
After making the adjustments, test the torsion spring balance by lifting the door to the halfway point and then gently releasing it. A properly balanced door should stay in place. If the door drifts upward, the springs are over-tensioned and need to be loosened. If it drops downward, additional tension is required. Make adjustments in quarter-turn increments, testing after each change. If your door uses two springs, always adjust both equally. Once the balance is correct, reconnect the opener and run a few full cycles to confirm smooth operation.
How to Adjust Extension Springs Step by Step
Extension springs are mounted vertically on either side of the garage door and stretch to provide counterbalance during operation. While they use different adjustment methods than torsion springs, they require the same level of caution and adherence to safety protocols.
1. Initial Door Positioning
Begin by opening the garage door fully to reduce tension on the extension springs. This position minimizes the amount of stored energy you are working with, making the adjustment process safer. Secure the door in the open position by placing C-clamps or locking pliers on the tracks just below the bottom rollers.
2. Locate the S-Hooks and Track Hangers
Extension springs are connected to the track hanger using S-hooks or J-hooks. The track hanger typically contains multiple holes that allow you to reposition the hook to adjust spring tension. Inspect both sides of the door to identify the current hook positions and the available adjustment holes.
3. Reposition the Hooks to Adjust Tension
- To increase spring tension, move the S-hook to a hole closer to the door (lower on the track hanger).
- To decrease spring tension, move the S-hook to a hole farther from the door (higher on the track hanger).
Repositioning the hook alters the effective length of the spring, directly changing its tension.
4. Account for Safety Cables
Extension springs should always have safety cables running through their centres to prevent the spring from becoming a projectile if it breaks. When repositioning the S-hook, carefully detach and reattach the safety cable as needed. Never operate or adjust extension springs without properly installed safety cables.
5. Use the Eye Bolt for Fine-Tuning
For more precise adjustments, locate the eye bolt at the end of each extension spring. Use an adjustable wrench to turn the eye bolt clockwise to increase tension or counterclockwise to decrease tension. This method allows for smaller, incremental changes, rather than repositioning the hooks, and is useful for fine-tuning door balance.
S-Hook Adjustment Method
The S-hook method is the simplest and most common way to adjust the tension of an extension spring on residential garage doors. With the door fully open and securely clamped, carefully remove the S-hook from its current position. Note the routing of the safety cable and detach it temporarily if needed. Move the S-hook to a different hole on the track hanger—lower holes increase tension, while higher holes decrease tension.
Most track hangers have three to five adjustment holes, and changes should be made one hole at a time. Each hole typically alters spring tension by about 15–20 pounds, which can significantly affect door balance. After each adjustment, reattach the safety cable, remove the clamps, and test the door using the halfway lift method. The door should remain stationary when released. Always make identical adjustments to both extension springs to prevent uneven movement, binding, and premature wear.
Testing and Balancing Your Garage Door
After adjusting your garage door springs, thorough testing is essential to confirm safe, balanced operation. Proper balance reduces strain on the opener, prevents premature wear, and eliminates potential safety hazards.
1. Perform Manual Balance Testing
Test the door’s balance at multiple points to ensure consistent performance:
- Lift the door to quarter height, halfway, and three-quarter height
- Gently release the door at each position
A properly balanced door should remain stationary at every height. Testing at multiple points helps reveal balance issues that may not be obvious when testing only one position.
2. Evaluate Door Performance
Observe how the door behaves during manual and automatic operation:
- Opens and closes smoothly without jerky or uneven movement
- Maintains a controlled closing speed
- Requires minimal effort to lift by hand
- Operates quietly and evenly when using the opener
Any resistance, drifting, or noise indicates that further adjustment may be needed.
3. Reconnect the Garage Door Opener
Once manual testing confirms proper balance:
- Pull the emergency release cord toward the door
- Ensure the opener carriage locks back onto the door arm
Run the opener through at least three full open-and-close cycles to verify smooth integration.
4. Complete Final Lubrication and Inspection
Finish the process with a final optimization step:
- Apply white lithium grease to spring coils, roller bearings, and hinges
- Check all bolts, brackets, and fasteners for tightness
- Observe one final door cycle to confirm smooth, balanced operation
Troubleshooting Common Issues After Adjustment
Even with careful spring adjustment, some garage door issues may persist. Identifying the underlying cause helps prevent further damage and ensures safe, reliable operation.
- Door Still Closing Too Fast: If the door continues to slam shut after adjustment, the springs may still lack sufficient tension. Add tension gradually using quarter-turn increments and test the balance after each adjustment. Also, inspect the rollers and tracks for wear or damage, as binding components can cause the door to close too quickly even when spring tension is correct.
- Uneven Door Movement: When one side of the door moves faster than the other, confirm that both springs have been adjusted equally. Inspect the tracks and rollers on both sides for alignment issues, bends, or excessive wear. Uneven movement can occur even with properly tensioned springs if mechanical components are damaged.
- Door Won’t Stay Open or Feels Heavy: This issue usually indicates insufficient spring tension. Gradually increase tension while performing frequent balance tests. If the door still feels heavy after reaching safe tension limits, the springs may be undersized or worn and may require replacement rather than further adjustment.
- Persistent Noises After Adjustment: Squeaking, grinding, or popping noises often signal a need for lubrication or worn hardware. Apply appropriate lubricant to the springs, rollers, and hinges. If the noise continues, inspect bearings, brackets, and tracks for damage.
- Opener Strain or Malfunction: If the garage door opener struggles or behaves erratically after adjustments, recheck the manual door balance. A properly balanced door should move smoothly by hand; if it does not, the opener will be forced to work harder and may malfunction.

When to Call a Professional Instead
Some garage door spring issues are best left to professionals for safety and reliability. If you find broken springs, frayed cables, or damaged hardware, stop immediately, as these components are dangerous to handle without proper tools and experience. Professional service is also recommended when multiple problems occur at once, such as binding tracks, worn rollers, and spring imbalance, since these issues are often interconnected. Commercial or unusually heavy doors use high-tension spring systems that exceed safe DIY limits. If you lack proper tools, stable ladder access, or sufficient mechanical experience, calling a professional is the safest way to avoid injury and prevent further damage.
Maintenance Tips to Prevent Future Adjustments
Regular maintenance helps extend the life of your garage door springs and reduces how often tension adjustments are needed. Consistent care also enhances safety and ensures the door operates smoothly.
Key maintenance practices include:
- Lubricate annually: Apply white lithium grease to the spring coils every 6–12 months, depending on usage and climate conditions. Lubricate rollers, hinges, and track channels at the same time to reduce friction and wear.
- Perform monthly inspections: Check springs for gaps between coils, rust, or visible stretching. Inspect cables for fraying and tracks for dents or misalignment. Test door balance monthly using the halfway lift test to catch issues early.
- Adjust for seasonal temperature changes: Temperature extremes can affect spring tension. Cold weather may reduce tension, while heat can increase it. Monitor door performance and make small adjustments as needed.
- Use the door properly: Avoid slamming the door, forcing it open, or hanging heavy objects from the door or tracks. Use the opener for normal operation to prevent uneven wear.
- Schedule professional maintenance: Annual professional inspections are especially beneficial for older or high-use systems, allowing potential issues to be addressed before they escalate into major repairs.
Abe’s Door Service: Trusted Overhead Door Experts in Edmonton
Abe’s Door Service has been a trusted name in overhead door solutions in Edmonton and the surrounding areas for more than 45 years. As a third-generation, family-owned company, Abe’s Door combines deep industry experience with a strong commitment to safety, quality workmanship, and customer service. They provide reliable residential and commercial garage door repair, installation, and maintenance, including 24/7 emergency service when issues can’t wait.
With a large service fleet, priority-based response system, and highly trained technicians, Abe’s Door is equipped to handle everything from simple repairs to complex commercial systems. Whether you need expert spring adjustments, full door replacements, or preventative maintenance, Abe’s Door Service delivers dependable solutions you can trust.
Summary
Understanding how to adjust overhead garage door springs allows you to maintain your garage door system more effectively while recognizing when professional assistance is needed. Successful spring adjustment depends on prioritizing safety, making gradual changes, and thoroughly testing the door to ensure proper balance.
Garage door springs are critical safety components that operate under tremendous tension. If you are ever uncertain about any part of the adjustment process, contacting a trusted professional such as Abe’s Door Service can help protect both your personal safety and your investment. Combined with regular maintenance and prompt attention to balance issues, professional support ensures your garage door continues to perform smoothly for years to come.
Frequently Asked Questions
Can I adjust garage door springs myself?
Yes, but only if you have the proper tools, understand the risks, and follow strict safety procedures. When in doubt, call a professional.
How do I know if my springs are properly adjusted?
A properly adjusted door should stay in place when lifted halfway and move smoothly without slamming or drifting.
What’s the difference between torsion and extension springs?
Torsion springs mount above the door and adjust by winding turns, while extension springs run along the tracks and adjust by repositioning hooks or eye bolts.
Why does my garage door opener struggle after spring adjustment?
If the door isn’t balanced manually, the opener must work harder, which can cause strain or malfunction.
How often should garage door springs be maintained?
Springs should be visually inspected monthly and lubricated every 6–12 months to extend their lifespan and maintain proper balance.